Email Configuration
Overview
Architecture
cxlogiq have a recommended best practice for routing email through Genesys Cloud for contact centre purposes. The email should still “land” on your existing mail server, then redirected to an unpublished Genesys domain specific to your organisation. Genesys can either impersonate your domain for the outbound route using Amazon Web Services as the sender or route the outbound email back through the corporate mail server.
This allows all incoming email to traverse through the corporate-defined rules, spam and virus protection, and logic before being received by the contact centre.
Note: Genesys Cloud is not a SPAM filtering and virus protection product, so these should be handled by the existing corporate IT infrastructure.
Diagrammatically the process looks like this:
Outbound Via Amazon SES
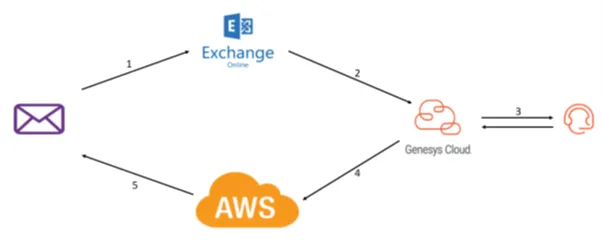
- Email from customer arrives on the existing corporate mail server.
- Email is then redirected to a predefined custom Genesys Cloud address.
- Email is queued and delivered to the appropriate skilled agent.
- When the agent replies, emails are sent to AWS.
- AWS sends the email to the customer using the corporate email address as the sender/reply-to address.
Note: Outbound email sent from Genesys Cloud can also be automatically BCC’d to a pre-defined address.
Note: Messages that are forwarded will appear to be forwarded from you, while messages that are redirected will appear to come from the original sender. Emails need to be Redirected to Genesys so that the reply address is correct for the customer
Outbound Via Office 365 Exchange Online
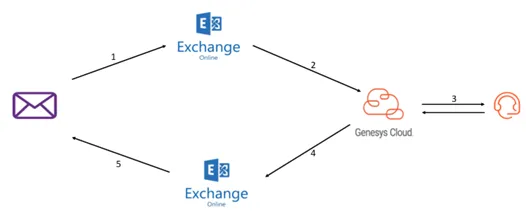
- Email from customer arrives on the existing corporate mail server.
- Email is then redirected to a predefined custom Genesys Cloud address.
- Email is queued and delivered to the appropriate skilled agent.
- When the agent replies, emails are sent via Exchange Online.
- Exchange Online sends the email to the customer using the corporate email address as the sender/reply-to address.
Note: Outbound email sent from Genesys Cloud can also be automatically BCC’d to a pre-defined address.
Domain Verification & DKIM
Genesys Cloud optionally uses DomainKeys Identified Mail (DKIM) for validation of sent email on behalf of customer domains to prevent emails from being flagged as SPAM by the recipient.
- DKIM defines a domain-level digital signature authentication framework for email by permitting a signing domain to assert responsibility for a message in transit.
- DKIM authenticates the reputation and identity of the email sender, and their email signing practices for additional handling (e.g., delivery, quarantine, or rejection).
- DKIM authentication of a message is validated via a cryptographic signature and querying the signer’s domain to retrieve a public key.
cxlogiq recommend configuring DKIM for all email domains configured in Genesys Cloud. To implement, additional records are required to be added to the DNS for the domain so that emails sent from Genesys are not flagged as SPAM by the recipient.
DNS Settings for Exchange/Exchange Model
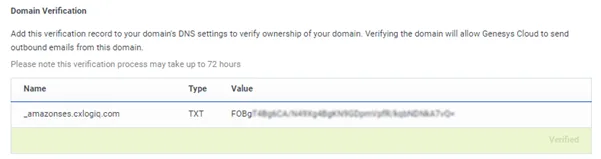
One TXT record and three CNAME records are added to the domain:
- The TXT is to verify ownership of the configured domain.
No CNAMEs are required when using Exchange Online as the outbound email method, as DKIM is not implemented as emails are being sent by the actual mail server for those domains.
DNS Settings for Exchange/AWS Model
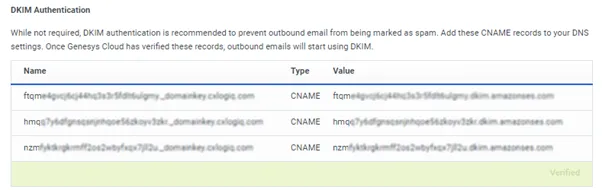
One TXT record and three CNAME records are added to the domain:
- The TXT is to verify ownership of the configured domain.
- The CNAMEs are used for DKIM.
Configure Outbound Email using Amazon Simple Email Service (SES)
The recommended configuration sequence is:
Testing/DEV/UAT
- Define the domain(s) to be used for routing email through Genesys Cloud.
- cxlogiq will add the domain(s) to Genesys Cloud, define a landing email address, and provide DNS records & landing address details.
- Customer adds the DNS records to their domain(s).
- cxlogiq will confirm that domain verification and DKIM have been verified.
If using AWS for the outbound method, additional DKIM CNAMEs will also need to be added to DNS.
If using Exchange Online for the outbound method, a workshop with cxlogiq will be required to configure an Entra application and install the SMTP integration in Genesys Cloud.
Note: These steps need to be performed for each of the required domains.
- Once completed, customer test email address(es) and forwards can be created to validate the process.
- Testing can now be performed on those addresses.
Production
- Because domain ownership and DKIM (if required) have already been configured and verified, the process of adding/migrating production addresses is to add the forwarding rule to those address(es) to forward to the defined landing address.
## Configure Outbound Email using Exchange Online
Introduction
With the introduction of various OAuth flows for Microsoft 365, it is now possible to set up Genesys Cloud email integration using the new Client Credential Grant Flow. For more detailed information, refer to the official Microsoft document on the OAuth 2.0 client credentials flow on the Microsoft identity platform.
Configure Mailbox and Mail Flow
Before registering the OAuth app in Entra ID, identify the mailbox that the service principal will be granted access to.
Creating an Application on the Azure Portal
- Login to Microsoft Entra ID.
- From the left menu, under the Manage submenu, choose “App registrations”.
- Create a new application by clicking on “New registration” in the top menu.
- Enter the application name, e.g.,
Genesys Cloud Email OAuth, and click on the Register button at the bottom of the page. - Copy the values for the fields as these will be needed later:
- Application (client) ID
- Directory (tenant) ID
- Click the “Endpoints” button and copy the value from the OAuth 2.0 token endpoint (v2) field.
- To create a secret for authentication, click on “Certificates & secrets” from the left menu. Click “New client secret”, add a description and expiration period, then click add to save.
- Copy the secret’s value.
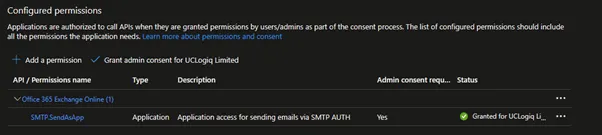
- In the Azure portal, choose the API Permissions blade in your Microsoft Entra application’s management view.
- Select Add permission.
- Select the APIs my organisation uses tab and search for “Office 365 Exchange Online”.
- Click Application permissions.
- Choose the SMTP.SendAsApp permission.
- Don’t forget to grant admin consent for the required permissions.
Register Service Principal in Exchange
When the application is registered on the Azure portal and all admin consents are in place, it is time to register the application’s service principal in Exchange using Exchange Online PowerShell.
Register the Entra AD application’s service principal in Exchange using the instructions linked below:
Register service principals in Exchange
Send CXLogiq the Following Properties to Configure the SMTP Integration in Genesys:
- Client ID
- Client Secret
- Access token endpoint
- User Name of the shared mailbox
Configuring Custom SMTP Integration in Genesys
Create and configure a custom SMTP integration in Genesys using the information from Microsoft.
- In the properties tab of the SMTP integration, enter basic SMTP settings as shown below.
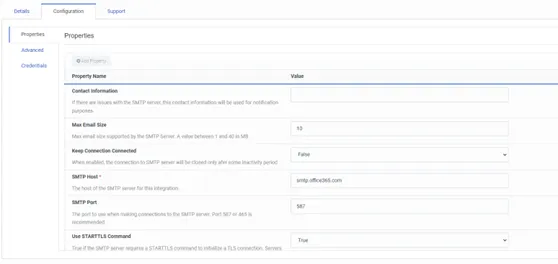
- Enter credentials by clicking Configure (or Change if previous settings exist). Enter the credentials from the App Registration. For the “Scopes” field, enter
https://outlook.office365.com/.default.
Known Error Codes
Since Genesys does not return any usable error information, debugging can be done using curl commands or checking the sign-in logs on the Azure portal.
Error 535 5.7.3
This error may occur if:
- Permissions given to the application are incorrect.
- The scope
https://outlook.office.com/.defaultis invalid. - The Entra AD application’s service principal in Exchange is not registered.
Error 535 5.7.139
This error may occur if the “Authenticated SMTP” option is not set on the mailbox used for OAuth 2.0 integration.
Please note: If tenant policies prohibit SMTP authentication, additional steps may be required to resolve errors.